OPI Muppets – Rainbow Connection

Last winter, as I was cruising my favorite nail blogs, I remember coming across a very rough preview of the newest OPI Muppets collection. We’re talking rough. The pictures of the polishes were thumbnail size and only pixelized when I tried to zoom in. Even with all the polishes crammed into a 1″ photo…I knew that I was going to go gaga over this line. As more and more sneak-peeks and previews of the line started to surface, I started to drool over the amazing glitters, metallics, and Miss Piggy pinks that taunted me through my computer screen. The collection was released in stores a few weeks ago, but I resisted heading to my local BeautyFirst store because I wanted to wait until I hit my I-lost-30 lbs. mark and my I-cleaned-my-disgusting-apartment mark to treat myself to some new lacquers.

Lucky for me (and you), I hit those marks. Wahoo!!

After about 6 hours of cleaning on Saturday, my boyfriend and I headed to our nearby shopping plaza for a trip to Target…and BeautyFirst. He even came in the store with me (what a guy, right?). After months and months of anticipation, I could finally hold the bottles, shake them, and check them out in person. It. was. EXCITING! (unless. you. were. my. boyfriend!….then it was ridiculous.) As I waffled between what colors to buy, he was standing over my shoulder saying “Just buy it. Just buy it.” …because he really wanted me to treat myself…or…because he reaalllly wanted to leave the store. Either way, I left with two amazing colors.

The moment I saw pictures of the muppet glitters, I knew I’d have to get my hands on Rainbow Connection, an amazing rainbow glitter. As soon as I saw the bottle in person, it was a done deal. EASY-PEASY. Out of all of the glitters this collection has to offer, Rainbow Connection is certainly the most…5 year-old’s birthday party meets a 20-something’s New Year’s Eve. But don’t you dare get me wrong- I mean that in the BEST WAY POSSIBLE. I love glitter, so this polish is basically my dream come true. This polish indulges my inner 13-year-old Hot Topic shopper, but it also satiates this 23 year old who loves a sophisticated yet funky manicure. While Rainbow Connection is a Glitter polish (with a capital G), when worn over other colors or as an accent nail, it can certainly be made to look fun yet grown-up.
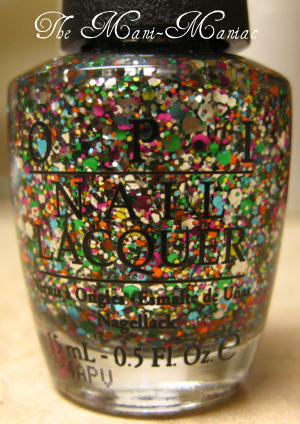
First, let’s look at this polish up close and personal. Let’s get all up in its grill. (yeah…I said it.)

Stop. Breathe. (I know it’s amazing, but you have to breathe!)

Seriously, though, it’s incredible.

Let’s talk about how dense this glitter is and how much you get in one bottle. Silver, gold, pink, blue, orange, yellow, green – round, hexagonal – small, medium, and large. It’s a party in a bottle.

The other thing I love about this glitter is that its base is absolutely clear. No gelly pink or blue or gray. Just clear. PURE GLITTER. (Heaven.) The clarity of the base makes it an easy layering polish (it will look the same over black as it will over white.)

My first reaction when I picked up the bottle was how closely I think it resembles Deborah Lippman’s Happy Birthday.  I say think because I don’t actually know how close it is. I’ve never seen DL’s rainbow glitter in person, and for $18 a pop, I never will. I may be a polish addict, but I’m not rich enough to be spending anything close to $18 on ONE bottle of polish. I find that price tag absurd. (Although one day, when this blog makes me millions of dollars, I might splurge on Deborah Lippmans. And $18 will still feel like a splurge – even though I’m a millionaire.)

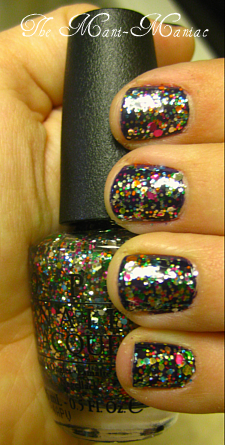
When I was looking at the painted swatches at the store, I noticed that the polish was totally opaque. I’m not an idiot, though, so I asked the lady how many coats that took. She replied, “I think, like, six?”. It looked awesome, but six coats of glitter is a recipe for bad drying time and early chipping. And so, when I got home, I got to picking the color I would use for my base color. I originally wanted to go with silver, but since Rainbow Connection is so silver-heavy, I didn’t want to lose the glitter against a silver base. I went between a few other colors but eventually settled with my favorite navy blue, Roadhouse Blues from OPI’s Touring America collection. I wanted a dark color for the glitter to pop against, and I knew it would do the trick.

OPI - Rainbow Connection

Since I knew I’d use two coats of Rainbow Connection, I chose to paint just a single coat of Roadhouse Blues. It is, after all, just a base color. After the navy dried, I applied one coat of Rainbow Connection. I purposely chose not to slather it on but to apply a coat of average thickness so that I could get a sense of the density of the glitter. You guys, it was GLITTERY. My giddy self started to hold it up to the light to watch it sparkle right away. After a second coat, I was thrilled. The navy blue obviously shows through, and I’m interested to see how Rainbow Connection will look over a lighter color or even a metallic. However, the glitter is definitely the star in this mani. It is super dense and extremely metallic. This polish shines in any light, and it shines bright. The silver glitter is particularly sparkly, but the larger chunks of color definitely pop. I love that from a distance, my nails look like a solid color but close up, you can see all the individual colors and sizes of glitter.

I topped it all off with a coat of Seche Vite and it was dry and ready to go in about seven minutes (not shabby for a glitter manicure!). About an hour later, I headed out to meet a good friend from college who I hadn’t seen in years. I met her on High Street, and even in the dark, she almost immediately noticed my nails. Ladies and gentlemen (probably not gentlemen), THAT is the effect of this polish. Even on a dark street, this manicure shines and sparkles. I love it. I LURV IT! (Lurv = when you love something so much that you distort the word whilst saying it. Think Kristin Wig as the Target Lady. She would definitely say LURV.)

I think that this polish will end up being an awesome accent nail and a great mani for any holiday party. It’s eye-catching, fun, and a definite shining star within the Muppets collection.

What’s your favorite glitter? Do you have a favorite from the new OPI Muppets collection?

Coming up next: another AMAZING Muppets color. I won’t tell you which one, but I will tell you that it’s freaking GORGEOUS! Get ready!

Halloween Half-Moon Mani

Hey, remember that time I said I’d update about some awesome Halloween mani’s before Halloween? …Yeeaahhhh, about that.

October, sweet October. Tis the season for candy corn, pumpkin beer, and…GERMS. Friends, I found myself with a terrible cold right around the 15th and my nose is still stuffy. Every time I started to feel better, one of my lovely (aka disgusting, germ-ridden) students would sneeze on my face. Yes, on my face. (I wish I was kidding.) I was sick enough to wear some nasty chipped polish on my nails for DAYS before slapping on some last minute Halloween colors, calling it a manicure, and settling for that. I even wore the Halloween mani for a few days past Halloween…which is so tacky. Oh well. At some point, you just have to put the polish away, turn on your humidifier, take a Nyquil, and call it a night. That is exactly what I did.

I figure that since I took a [pretty crappy] picture of my Halloween nails, I might as well show them to you. While this won’t do you much good in terms of Halloween inspiration, maybe the manicure style itself will give you some ideas.

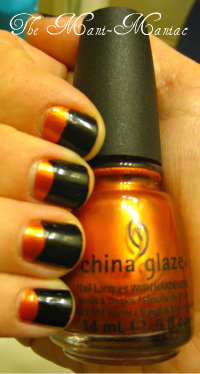
A few Sally Beauty trips ago, I spotted this awesome China Glaze color, Cross Iron 360. It is a really incredible metallic orange, but not so orange that’s it’s not wearable. It’s more of a copper orange than a candy-corn orange (if that makes sense at all). When I sat down to do my Halloween nails, I knew this color would work for so many different things. My immediate inclination (since I was feeling sick and lazy) was to slap some OPI Black Shatter over it and call it a day. I knew that would be too easy, so I decided to try something slightly more entailed. The half-moon mani (aka the reverse french manicure) is essentially an upside-down french manicure and was popular amongst celebrities in the 20s and 30s. Today’s celebrities such as Lauren Conrad, Maya, and most notably Dita Von Teese have all been spotted wearing moon-mani’s, and many runway shows have spotlighted the moon-mani, as well.

If you google “moon manicure” or “half-moon manicure,” you’ll see that the color combinations are endless. Some people choose colors that are close in shade while some people choose totally contrasting polishes. It all depends on what look you’re going for. Being that this manicure was for Halloween, I chose black as my accompanying color.

***DISCLAIMER: The tried and true way to accomplish this manicure requires those little round stickers you buy at an office supply store to reinforce punched holes. They keep the curvature and size of your ‘half-moons’ uniform. …I did not have those. Hence therefore, my half-moon mani is pretty janky. We’ll return to this manicure another time for a true tutorial.

China Glaze - Cross Iron 360, Finger Paints - Black Expressionism

To accomplish this look, I painted 2 coats of Cross Iron 360 and let it dry completely (20 minutes-ish). Then, I carefully cut small curved pieces of masking tape (what a pain in the you-know-what) and applied them to the top of my nails. (**When applying any type of tape over freshly painted nails, it is always safe to stick the tape to the palm of your hand once or twice. This lessens the stickiness factor and helps with keeping the polish underneath from being ruined when removing the tape.) After all of the curved tape was applied to my nails, I did one more smooth-over to make sure there were no wrinkles or bubbles for my black to get under. One finger at a time, I painted one coat of Finger Paints Black Expressionism over the tape and the nail. Then, I carefully removed the masking tape, revealing the orange ‘half-moons’ at the top of each finger. I finished the mani off with a coat of Seche Vite top coat (thank the sweet lord for fast drying top coats) and then curled up in bed with my Nyquil.

Voila, folks! There you have it! That’s the not so easy/proper way of accomplishing a half-moon manicure, and I think these colors made for a pretty cool Halloween effect. I got some compliments from parents at our school’s Halloween party, so I would say ‘mission accomplished!’ Next year, I’ll get fancier (providing I can breathe, talk, and function without feeling like a congested zombie).

Coming up soon (possibly even tonight): OPI MUPPETS!!!! I have been waiting for months and months to get my hands on some of the new Muppet inspired glitters and metallics, and gosh-darnit, I’VE GOT ‘EM! Stay tuned…

Product Review: Sephora Nail Bling – Black Rainbow

Shalom, friends! It’s been almost an entire month since my last post (something I’m not proud of), but I promise I haven’t really sported any new or exciting shades that I think you’ve missed out on. The past few weeks have been jam-packed with lots of work items to take care of and, of course, the Jewish High Holidays. In addition to a new year, lots of delicious food, and one day of being really hungry (followed directly by more delicious food), Rosh Hashana and Yom Kippur also bring with them the constant need wear dressy clothing and shake lots of old rich peoples’ hands. It is the hand-shaking component of the holidays that make me nervous to wear anything too crazy on my nails, so I pretty much donned a really neutral metallic shade (not gold, not silver, not bronze, just…metal) on short nails for almost 3 weeks straight. It was a nice color, and I’m sure I’ll get around to reviewing it, but it was nothing magical. It matched my various high holiday dresses, and I didn’t receive any nasty looks from old Jewish ladies when I shook their hands…so I’d say it fulfilled its purpose.

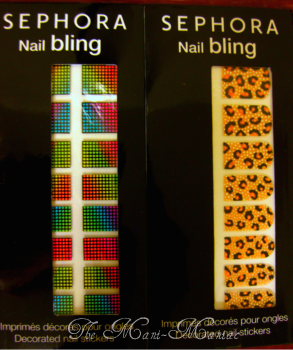
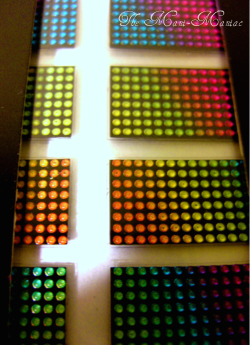
After the holidays, I was really excited to try out something I’ve had up my sleeves for a while. I stopped into Sephora a few weeks ago while my mother was visiting me, and as I was checking out their Sephora by OPI display, my eyes were drawn to one of their counter-side displays. There, in front of me, were some of the funkiest nail strips I had ever seen. Unlike Sally Hansen’s strips, Sephora Nail Bling strips are textured with individual little gems (and by gems, I mean plastic dots that look like gems).

The strips come in a variety of designs ranging from leopard to floral to lattice, and they are awesome looking! I have used SH’s nail strips a few times and have always had a good experience with them, so I was intrigued to see how these textured strips would hold up compared to the flat Sally Hansen’s we’ve become accustomed to. At only $7.00 a pack (compared to $8.00-$10.00 for a pack of Sally Hansen strips), I HAD to try them! I purchased two packs – one in ‘Gold Leopard,’ and one in ‘Black Rainbow.’ This will focus on the ‘Black Rainbow’ strips.

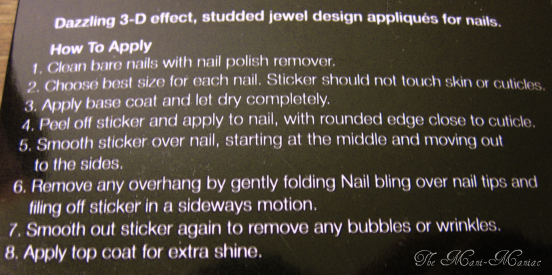
The directions seemed simple enough, but there were a few differences between the suggested application of these and the suggested application of the SH strips.

Sally Hansen’s nail strips come with a double-sided file/nail buffer and an orange stick. These strips come with neither. Sally Hansen suggests cleaning nails with remover, buffing, and then cleaning once more. Sephora’s strips do not ask you to buff your nail but to apply a base-coat instead. Having had successful experiences with the SH application process, I felt skeptical about the lack of buffing and the application of a base coat, but I ultimately decided to follow the direction on the pack.

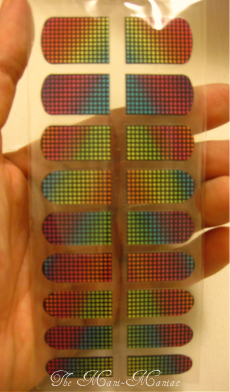
As you can see, the strips come in a good variety of sizes (9 sizes for each hand), and it’s nice to know that with eight extra strips in the pack, there is room for mistakes. You will never be left with one naked nail due to lack of strips (unless you really really stink at applying these.) I had a pretty easy time finding strips that fit my nails, but I can’t say there were any exact matches. With SH strips, the orange stick can be used to trim any excess that may extend past the width of the nail. They are relatively easy to tear and the orange stick works nicely. When I took these strips out of the package, I could already tell that they are MUCH thicker and less flexible than SH strips. I knew that there would be no trimming off the sides, and as the directions state, these strips should not touch skin or cuticle. So, when choosing which sizes to use, I always opted for the smaller choice. I figured that even if the strip didn’t quite fill up my nail, they would last longer if they were not hanging off the sides – allowing water underneath and snagging on things.

If you look at the design of these strips closely, you might notice that each strip goes through a gradient of about 3-4 colors. The color really starts to change about half-way down the length of the strip, and herein lies my first issue with this product. Unless you wear your nails really long and really square (so 1990’s if you ask me), you will not be using the bottom half of these strips. And if you are wearing your nails that long, you probably shouldn’t be wearing these anyways…because that would look cray-cray. My point, folks, is that for a person with short-medium nails, you really don’t get the full effect of the rainbow these strips have to offer. [Sigh]…Oh well.

Overall, the application of these strips was pretty simple and user-friendly. After I let my base coat dry completely (I use Seche Vite), I started by peeling one strip off of the plastic. I chose to start with my left pointer finger because I knew that if I messed up the strip, there were extras that would be similar to the size of my pointer nail. I didn’t mess up, however. It went pretty smoothly. I applied the round edge of the strip as close to the cuticle as possible (without touching it), and smoothed the strip over from the middle moving outwards. After I was sure there were no bubbles or wrinkles, I folded the bottom of the strip over my nail and pressed it down. I first attempted to file the excess strip off with a fine-grade nail file (simliar to the type SH provides), but it was immediately obvious that the fine file was not going to cut it…haha, get it? I chose one of my grittiest files and started to file. It worked much better, but another issue became quickly apparent: if any of the little beads/gems are hanging off the tip of your nail even a little bit, they are coming off with the excess strip. I guess that’s good because it would be infuriating to have little round things hanging off your nails and snagging your pantyhose (if you wear them…which I do not. That example was mostly just for effect because we ALL know how frustrating it is to snag pantyhose. I get angry just thinking about it.). So, each nail I applied went on smoothly, but each time I filed off the ends, a few little gems came with the excess. It wouldn’t bother me as much if the base of these strips wasn’t black, but because it is black, there are just some gaps at the tips of my nails. Again…[sigh]…oh well. Ten nails later annnddd…..

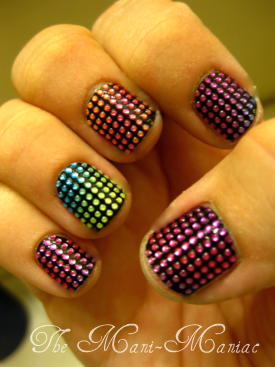
Voila! I think that the overall effect of these strips is pretty dang suh-weet! I chose to photograph my right hand for these shots because I lost the least amount of gems on the tips of my nails on this hand. (I think it was probably because I had five nails of practice before I got to this hand…) If you look at my middle finger, you’ll see what I mean about the black gaps where they’re missing. In the end, though, I think it looks awesome! I even unintentionally ended up with an accent nail! The strip that best fit my ring fingers happened to be blue/green/yellow as opposed to my other pink/purple and red/orange nails.

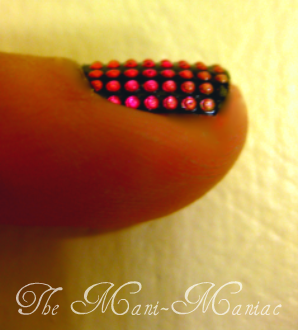
If you look at the profile of my pointer finger, you can see how these gems really give the strip texture. I cannot tell you how many people have asked to feel my nails this week. And, the truth is, I don’t blame them. If I saw someone wearing these, I’d ask to touch them, too. They are obviously 3D, and it’s awesome. They are bumpy, but not so bumpy that I’ve found them annoying to wear. They are just bumpy enough that they feel and look awesome.

After all of the strips were on, I applied a thick coat of top coat. Usually, I use Seche Vite, but I didn’t want a fast-dry top coat to shrink or distort the strips. After taking my photos and reveling in my new mani, I knew that all there was to do now was wait. Wait to see how these would hold up, wait to see how fast they would peel off, or wait to see if I would snag them on some clothes.

Well, friends, I have to tell you that my hands did a LOT of things in the past 7 days. These things include:

  • Playing Guitar
  • Cleaning lunch tables with lots and lots of lysol wipes
  • Doing art projects with lots of Elmers Glue EVERYWHERE
  • Opening about a gazillion yogurts, string-cheeses, and tupperware containers
  • Washing my hands at least 40 times a day
  • Making stuffed acorn squash (and cleaning up the pots and pans afterwards)
  • Going apple picking
  • Making apple crisp (and cleaning up the pots and pans afterwards)
  • Showering once or twice a day (and I did not take it easy on washing my hair. I scrubbed my head like normal)
  • Playing tug with my dog
  • Lifting weights
  • Cleaning my bathroom
  • Cleaning my kitchen
So…you get the point. My nails had a busy week. Curious to see how these strips held up?
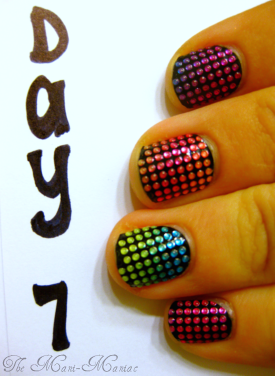
Here you go! Day 7 and still going strong. Some of the tips are a little worn down, but there are not loose corners and peeling sides. They are definitely going strong. The only thing that is starting to bother me is that my nails are growing and so is the gap at the top of the strips. But that comes with the territory, and I know that. I have to say that I am very surprised with how well these have stayed on given how not gentle I was on them. SH nail strips advertise themselves as lasting 10 days, and I have seen them do that. It has only been 7 days with these Sephora Nail Bling strips, but I expect them to make it through the next few days. I’ll keep you posted!
I would absolutely recommend this product to anyone interested in spicing up their everyday mani with something a little more fun! They are available in much more subtle designs and patterns, and you can find them in Sephora stores or online here.
Has anyone else tried these strips? Was your experience positive or negative?
That’s it for tonight, but keep your eyes peeled for some awesome halloween manis I have coming soon! I just started ‘The Walking Dead’ series on Netflix and I’m officially in the Halloween state-of-mind. Get ready, mani-maniacs! Halloween nails are basically my favorite thing ever, so keep a look-out in the next two weeks!

The Accent Nail: Let’s Discuss

If you know me or my family, you know that award shows are a BIG DEAL to us. Ever since I can remember, award nights (i.e. the Oscars, the Emmys, the Golden Globes, etc.) have been staples in our annual family get-togethers. Right up there next to Thanksgiving and Chanukah (and our annual Chanukah ham…hilarious), award show evenings are a time when my grandparents, aunt and uncle, parents, and I convene to feast and watch our favorite celebrities…well…win awards! But equally as importantly as the awards to my family is the red carpet. Yes, the Emmys ceremony this past weekend began at 8pm. But for my crew, the main event started at 6:00 sharp with the E! red carpet team. Now that I live in Columbus, I have to gawk at the amazing and…not-so-amazing gowns and tuxedos with my family via telephone. And so, At 6:45, I called my mother’s cell phone to discuss Nina Dobrev’s amazing red Donna Karen gown, Julianna Margulies’s horrendous white futuristic/ugly dress, and Alan Cumming’s red clown pants. After speaking with my grandmother about Christina Hendrix’s ridiculous ‘boobage,’ I knew the night was in full swing.

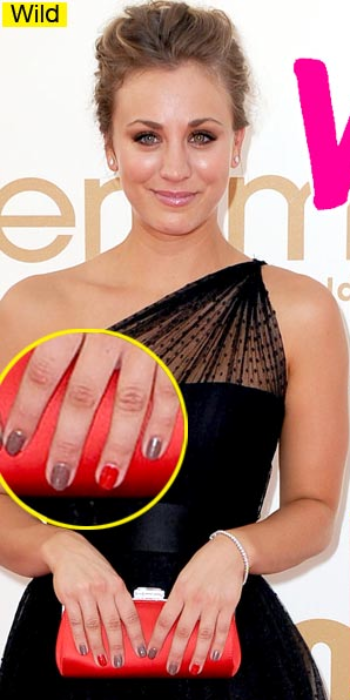
This year’s Emmys red carpet was not a disappointment, and I thought that the majority of my favorite TV stars knocked it out of the park. What does this have to do with this blog, you ask? Well, dear readers, as she was talking to Ryan Seacrest, I spotted one of this year’s hottest nail trends, the accent nail,  gracing the fingers of The Big Bang Theory’s Kaley Cuoco. Take a look:

Kaley Cuoco's Emmy Nails

First of all, Kaley’s dress, hair, and makeup are perfection. Way to go, girl! But most importantly, her nails are awesome! When interviewed on the carpet, she told Ryan that she hoped her mismatched red and gray nails would bring her nominated castmates good luck (as if Jim Parsons needed any luck at all). She sported OPI’s Over the Taupe and Big Red Apple, and she definitely killed two nail-trend birds with one manicure: greige and the accent nail. The grey-beige trend has been hot for a while, and the accent nail trend has been on the scene for quite some time with celebrities such as Katy Perry, Rihanna, and Vanessa Hudgens  spotted with mismatching nails on various red carpets. Kaley’s Emmy manicure got me thinking about the accent nail trend and the various ways I’ve seen this worn.


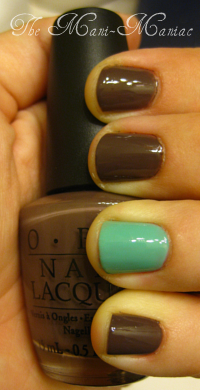
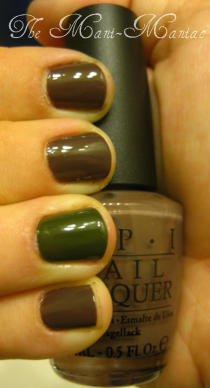
The accent nail trend is something that I have worn a few times, and I’m always torn about how to do it. Should the colors be contrasting? Should they be similar? Is it better to accent the one nail with something subtle like a matte or glitter top coat? And so, readers, I ask you what YOUR thoughts are. I’ve provided two accent nail manis – both using OPI’s You Don’t Know Jacques for the ‘non-accented’ fingers. I figure I’ll use this greige (one of my favorites) as a controlled variable in this situation and paint one hand with a contrasting accent nail and the other with a subtle accent nail. Which works better? I’ll let you decide.

You Don’t Know Jacques definitely airs on the side of brown in terms of greige polishes (my camera also makes it look more cocoa-ish than it looks in person), so I channeled the classic Tiffany’s box for this accent nail mani. Using Essie’s Turquoise and Caicos for my ring finger, this mani features a contrasting accent nail. I like how these colors compliment each other, but I am always a little uneasy about how much the accent nail sticks out. What do YOU think?

(On a separate note, the first coat You Don’t Know Jacques applies a little streaky, but it covers completely and finishes smooth with one more coat. Turquoise and Caicos takes three coats, and it is my absolute favorite aqua polish I own…and I own a lot of them.)


On my right hand (yes, my hands currently have two different accent nails…maybe I’m starting a mismatching mismatched nails trend?), I used China Glaze’s Westside Warrior for my ring finger. I chose this color because the military green polish is another popular nail trend and because I think it is a subtle accent to You Don’t Know Jacques. Part of me loves that the colors are close enough that at first glance you don’t really catch the accent nail. However, the other part of me thinks that if you’re going to rock an accent nail, why make it almost unnoticeable? What do YOU think?

(Westside Warrior (as seen before in the Antique Rose tutorial) applies flawlessly in two coats. I LOVE IT.)


So, readers, what do you think? Which take on this popular polish trend tickles your fancy? Is it better to make a statement with a bold accent nail or to don a more inconspicuous accent nail? Is it better to avoid the accent nail trend all together?

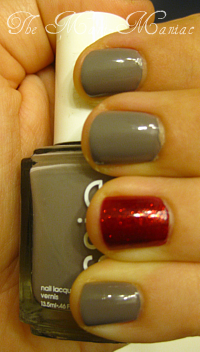
Essie - Cinchilly & Milani - Ruby Jewels

Lastly, if Kaley Cuoco’s red and grey mismatching nails did bring some good luck and helped Jim Parsons take home his second consecutive Emmy award, I thought I might as well sport a scarlet and grey accent nail mani to try and bring some much needed luck to our beloved (and struggling) Buckeyes. If we win this weekend…you’re VERY welcome, Buckeye Nation.

(For the record, my nails are ridiculously short because I’ve been playing guitar for my music classes. Also, my cuticles look uber-janky because I’ve been knuckle deep in Elmers Glue at school this week and peeling it off takes its toll. Oh well.)

China Glaze – Midtown Magic

If there’s one thing that I NEVER do, it’s wear chipped nail polish. I rarely have bare nails, but I will always rock naked nails before I wear them chipped. My late Grandma Ruthy (who always wore long acrylics with a french manicure) always told me that having nicely polished nails was a great way of making a good impression. I distinctly remember traveling with her on an airplane when I was about ten years old, and she told me that I needed to do my nails before we left for the airport. She was clearly of the generation when looking nice to travel was important. (She would probably be appalled at the myriad of sweatpants and hoodies (not to mention a serious lack of makeup) that I have worn on airplanes.  I honestly think that her bit of mani-advice has always stuck with me, and I get a little peeved when I see ladies with terribly chipped nails. What is the point of wearing a hot outfit when it looks like your nails have been rubbed against a cheese grater? I always remove and repaint when my mani is past its prime…except for this past week. Oy.

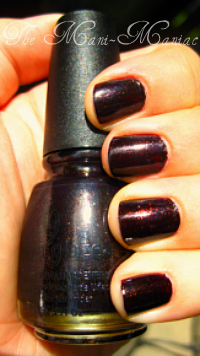
When I started my new teaching job, I had no idea how absolutely exhausted I would be. Each night, as I looked down at my increasingly ragged looking polish, I vowed to remove it before I went to sleep. But, as I couldn’t stay awake past 9:45 any night this week (when did I become 76 years old?!), the nail polish remover sat untouched on my nightstand. The worst part? I was wearing DARK polish, and we ALL know that dark polish shows the most wear and tear and looks particularly ‘janky’ when it starts to chip. I definitely wanted to review this shade, but I didn’t have a minute to photograph it until the tips had already started to wear and my cuticles started to peel. So, friends, be kind about this photo. I recognize the fact that this mani is subpar, but it’s all my exhausted self could handle. Let’s get to the review, shall we?

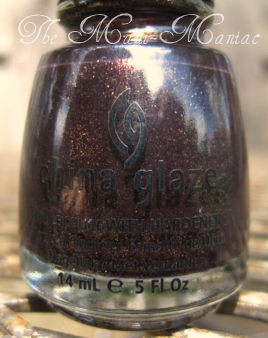
China Glaze - Midtown Magic

This China Glaze shade is called Midtown Magic, and it is from the most recent Metro collection. When I saw it on the shelf, I immediately had to pick it up and hold it up to the light. I was immediately intrigued by how confusing this color is! Is it brown? Is it plum? Is it black? I literally couldn’t tell. I could see that it was chock-full of gold, copper, and olive micro-glitter. I had to buy it JUST so I could take it home and invesitgate what color it is! As you can see, this color could go a few ways, and I was dead set on figuring it out.


China Glaze - Midtown Magic

Here’s the thing…I still don’t get this color. All of that gold and olive glitter that you see in the bottle seems to disappear on the nail, and the only shimmer that shines through is a coppery red micro-glitter. Don’t get me wrong, I enjoy a copper shimmer. But not when it’s completely unexpected and it overpowers the shimmer I  was expecting! When I was applying this polish, the base was a plum(ish) jelly. After two coats, however, it’s basically black. In reeeeaaaallllllyyyyy good light, it’s a deep (we’re talking DEEP) brown, but unless you are carefully inspecting this polish, it’s black with red/copper shimmer. If I spent all day in the sun, I might love this polish. In the sun, it really shines. But indoors, the shimmer is minimal and the color is black. Midtown Magic is perfect for halloween but not a shade I would wear just for fun. It is definitely fall appropriate, but as a lover of dark polish, this is not one of my favorites. (Sorry, China Glaze.)

I think this color should be titled Midtown MYSTERY because after a week of wearing it (even chipped), I am still not quite sure what color I was wearing. It is an absolute enigma. I don’t understand it. In China Glaze’s defense however, the application of this polish was flawless. Like all of the other China Glaze’s I have used, the formula applies smooth and even (it is totally self-leveling) and it covers completely in two coats. In the end, though, this might be one of those colors that sinks to the bottom of my nail polish drawer. Oh well, it was worth a shot!

Does anyone own Midtown Magic? What color do YOU think it is?